
Decko Decking Installation
You will not require any specialist tools other than what is usually required to fit a standard timber deck. You must take normal safety precautions during the the installation. When using power tools it is essential to follow the manufacturing instructions regarding safety and always wear Personal Protection Equipment (PPE).
Deck Product Range

Subframe
Decko Composite Decking can be installed onto any of the following;
Timber (Treated softwood or hardwood)
PVCu or Composite Joists
Aluminium Joists
Please consult the manufacturers for fitting instructions regarding the subframe.
You will require 5mm per metre fall on the subframe. A maximum span of 250mm is required between the first and second support joists, this applies to the second to the last and last joists - See Diagram 1 below.
A maximum of 400mm centres is recommended for all other support beams
A maximum overhang of 50mm is permitted for the ends of the deck

Installing your deck boards
Once the sub frame is built and fixed into place you are ready to start installing your Dekco Composite Decking Boards. To begin you will need to lay a row of start/finish clips along the first run of your subframe for the first row of boards to fit into (see diagram 2).
From the first support batten on the subframe the start/finish clips should be spaced apart at 400mm maximum. Once down the clips will allow an easy starting point for your decking and will hold the first row of boards in place.

Using the screws provided fix the start/finish clips to the support joists making sure you allow a minimum gap of 5mm at the end (see diagram 3).
Your start/finish clips will also need to be in line with each other.

Once your start/finish clips are in place it is time to lay your first row of deck boards, to do this you simply slide your deck boards into the clips as shown in diagram 4.
If there is any resistance at all you may need to give the boards a gentle tap with a hammer and tapping block, repeat this until all boards are in the desired position and fit flush inside the start/finish clips.

A maximum overhang of 50mm is allowed at the end of the deck boards, and all deck boards should span a minimum of three support joists on the sub frame - see diagram 5.
It is important to follow these guidelines as failure to do so could result in a faulty deck.
When the first row of boards are in position you will need to place a deck fixing with screw into the groove of the deck boards (see diagram 6 below) above each joist, taking care not to tighten the screws too much at this point. You will need to ensure the correct position before you can fully tighten the screws.
Get another deck board onto the other side of the deck fixings. Once in the correct place fix the screw into the support batten underneath, still taking care not to over tighten the crack the fixing - see diagrams 7 & 8 below.


This process is now repeated until you come to the end of your deck. When you reach the end point you may be able to finish with a full board, if not you may have to cut the boards of the last row down to size (see diagram 9) to give you a flush finish at the end of your deck, and to allow for the use of the start/finish clip.
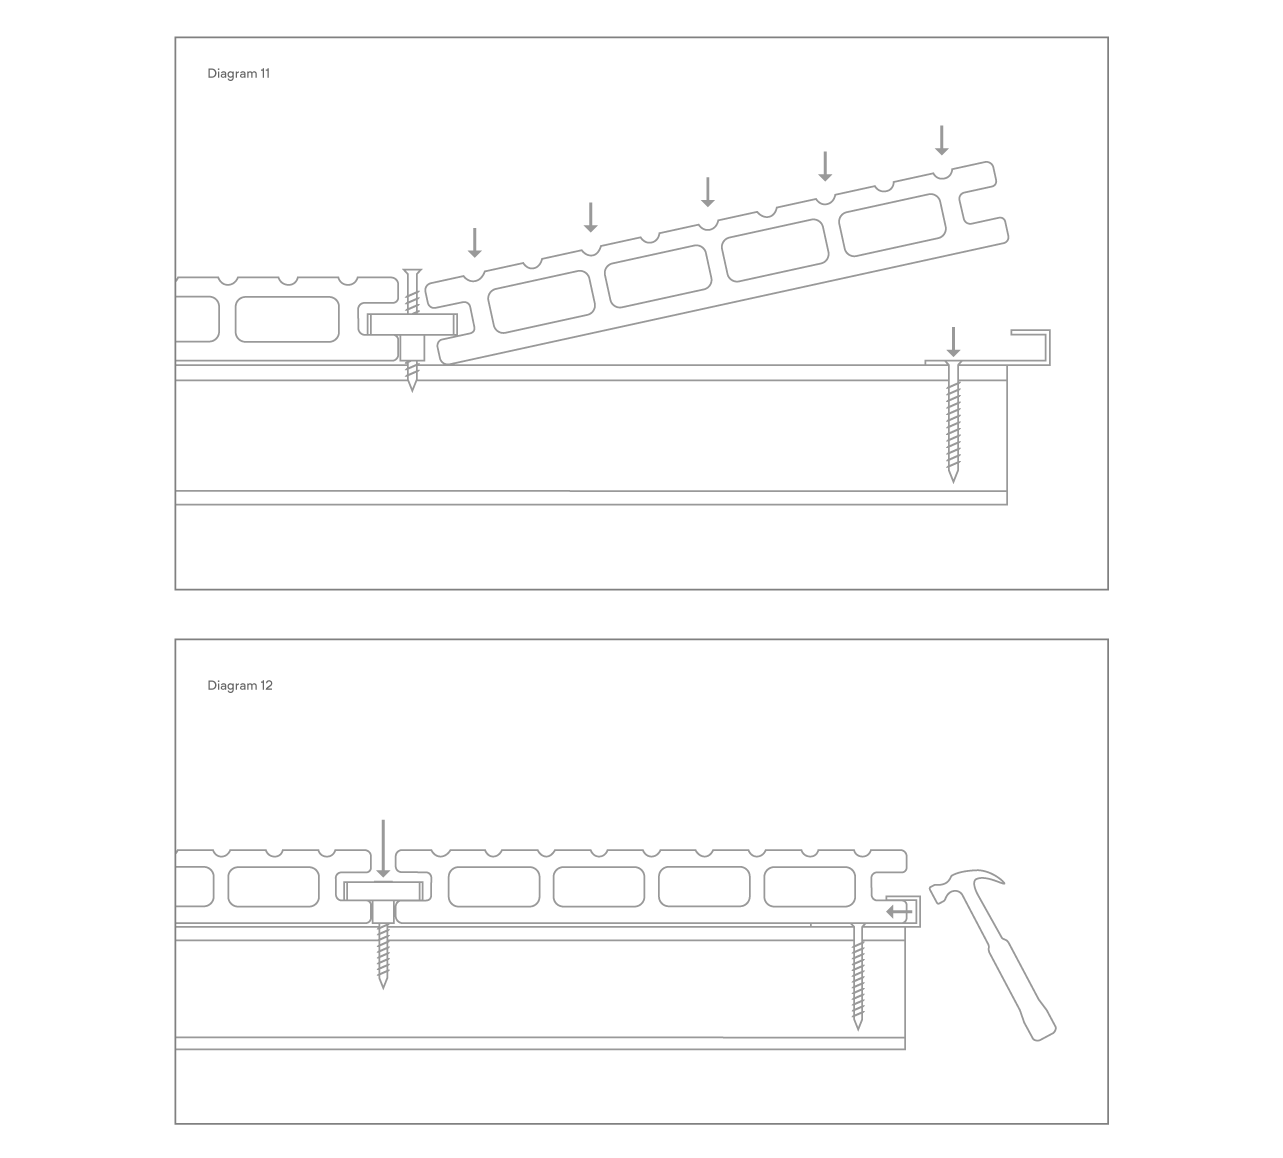
Before installing the last row of deck boards you will need to again install a row of start/finish clips. First you will need to fix the clip to the support batten with the screw, taking care not too tighten too much, you need to make sure that to begin with the back edge of the clip is flush with the edge of the support batten (see diagram 10). You then need to pull the start/finish clip back as far as it will go (see diagram 11).

Now tighten the screw on the start/finish clips just a little bit more before placing your last row of deck boards. Once this has been done you can place your deck boards (see diagram 12). When you are happy that your last row of deck boards are in position you can tighten the screws along the last row of deck fixings.
To finish, using a hammer and tapping block, you will need to gently tap the start/finish clips to grip the back edge of the deck boards (see diagram 13).
Anti-Walk Fixings
In some case especially in shorter lengths, you may experience some slight movement in the boards. Its is important to note that this will disappear over time as the boards will absorb moisture and tighten on the fixings. To prevent this from happening you might want to use the anti-wall fixings.
You must only use one anti-walking fixing per board as using more than one could cause deformation as the expansion and contraction will be restricted - see diagram 14.
By using just one anti-walk fixing per board, and on a centre joist, this will act as an anchor point allowing expansion and contraction to take place either side of the fixing - see diagram 15.
If you use the anti-wall fixing on an outside joist, it will only allow for expansion and contraction in one direction - see diagram 16.


The placement of the anti-walk fixings is much the same as the deck fixing, you simply push the fixing into the groove of the deck board, once happy with the position, your first screw will go down through the anti-walk fixing and into the support batten beneath it, and the second screw will go through the side of the fixing and should break through the second internal wall of the deck board - see diagram 17.

Finishing Trims
When using end caps it is essential to drill a few holes to the underside of your deck board to ensure air circulation - see diagram 18. Once the the holes have been drilled the end cap simply slots into place at the end of the deck board.
When using the skirting trim it is vital to pre-drill the holes larger than the diameter of the screw. It is advisable to fix in the centre of the skirting every 400mm maximum. The first and last screw of each skirting trim should not be more than 40mm from the ends.

Expansion and Contraction
When installing Dekco Composite Decking you will need to take into account expansion and contraction and allow the correct gap on the butt joints (end to end). Please use the below chart to assist in showing the correct gap to leave. Please note that that this chart relates to the board temperature and not the ambient weather conditions.

